0 Comments
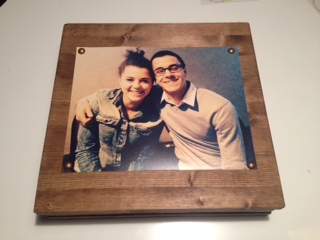
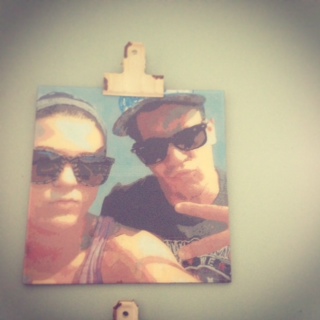
 Last post I talked about handmade gifts, which are great for anytime of year not just Christmas. However I did make a quick and easy but always appreciated by the grandparents in our family photo gift. Last year it was photo cubes (see here http://urbannest.weebly.com/urbannest/photo-gift-it) This year I decided to do one larger photo. This is how I did it. . . . . First I took a trip to my local Lowes and picked up some pre-finished craft wood. It was about $15 for a piece large enough to make three 12 by 12 squares. I cut them myself - ooh I know scary! I didn't break the saw this time. So if I can do it so can you.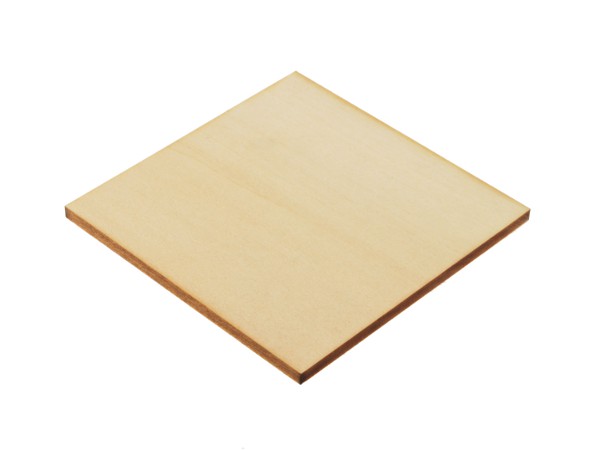 Next I stained each square with my handy dandy ( well used) Early American stain from Minwax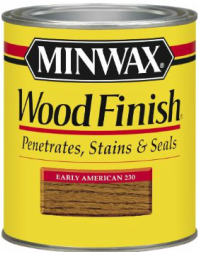 Finally after having 3 8x10 photos developed at Costco. I made them sepia toned which I thought would look nicer with the wood. Then I attached them to the wood using copper nail heads (also from Lowes- $1.59 a pack of 25) I put eye hooks and picture wire on the back and they were ready to hang!
This was such an easy project to do but for me it had big pay off. Who doesn't love a photo of their family. Well.... maybe some of you may not! Maybe a photo of your pet or say Johnny Depp? Get out there snap a great picture and make this for someone or yourself. . . . . . .
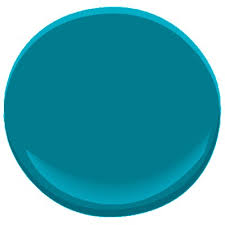
It all started because I wanted to give the grandparents in our family something different. I try to give something meaningful, something creative usually with a family connection. I saw some beautiful leather journals and thought how they could be used for our family. Fill them with our history, the answers to questions we always wanted to know. When ever we have get- togethers the stories come out and we share them around the table. So I grabbed some supplies and set to work. 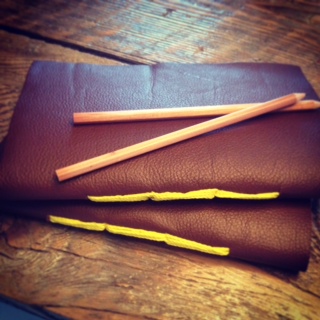 Finally I printed off a list of questions to be answered and bought wooden pencils and tied them altogether ready to be given and filled out by the family. We decided next Christmas we would share the answers to all the questions. Keeping our history alive. . . . What would you use yours for if you made one too? Here are some other journals I found. Maybe one of these ideas could be for you . . . . . 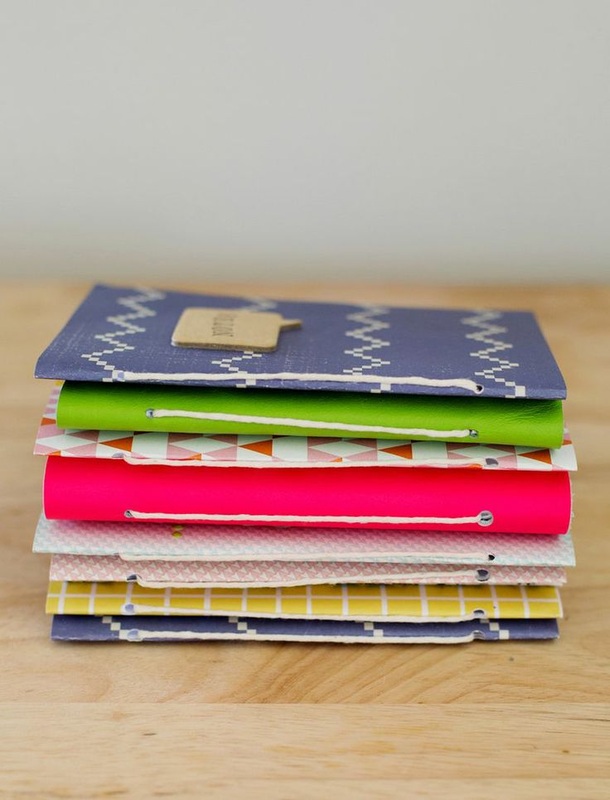 Quick, simple and eye catching from abeautifulmess 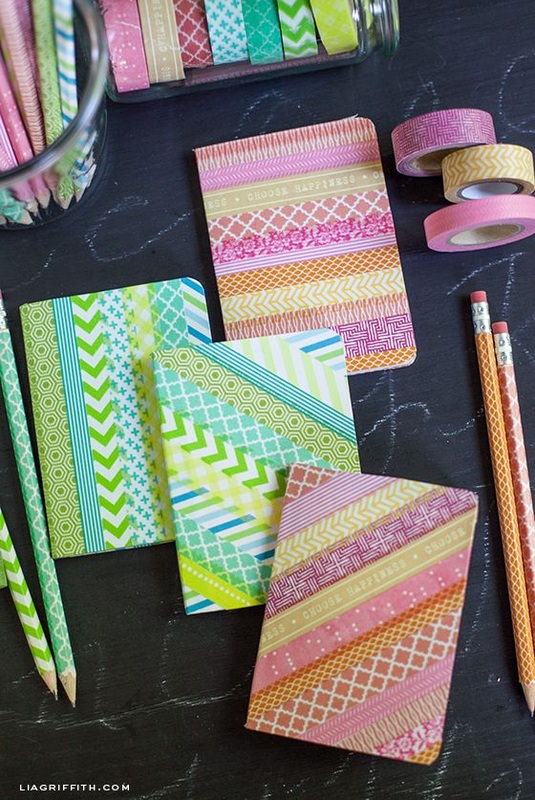 Wonderful washi tape from liagriffith 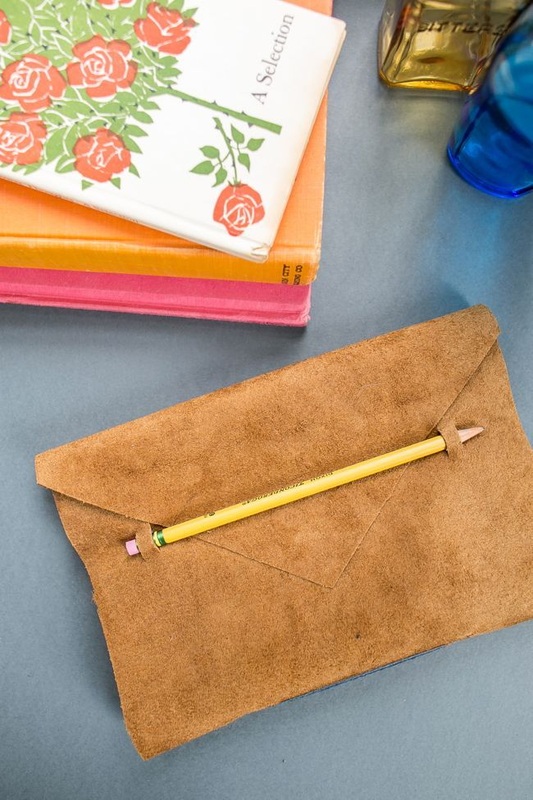 Suede envelope journal found on hellonatural New Year, New Projects. Stay tuned to see what this year has in store. 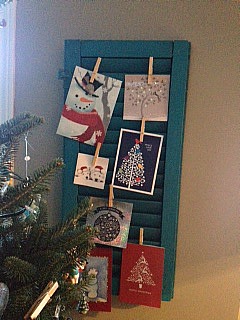 Shutter's Up Card Holder Shutter's Up Card Holder As we all know Christmas is only a week away and most of us have our decorations up and some if not all gifts bought and maybe wrapped. Well if like me you still get Christmas cards in the mail then you probably display them somewhere for all to see. I have used wreaths, ribbon and card holders in the past but this year I decided to use a great old shutter I picked up on a weekend in Quebec with my husband. Yes poor guy I dragged him to a whole collection of antique and salvage stores. How romantic! I found the wooden shutter outside looking lonely and dejected so decided to grab it, knowing I could use it somehow. Now was the time.. . . . . I cleaned up the shutter and then made my own chalk paint to paint it with. I had a leftover tester pot from a previous project in Benjamin Moore's Caribbean Blue water (2055-30) See dresser makeover here http://urbannest.weebly.com/urbannest/category/all%20dressed72954ab96b) RECIPE FOR CHALK PAINT
   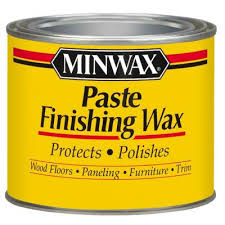 There are many recipes out there, this was the one I tried and it worked. Honestly though most of the time I just judge by eye and mix my own. Usually these tester samples are not designed to be durable on their own they are just for showing you the colour to help in your decision making. So I added furniture paste wax to the top once the shutter was mostly covered to protect it. I wanted a distressed feel still though so I left parts the original old brown. Here's the finished project. I used clothes pins to clip the cards on to the louvres. Simple and festive! My motto is re-purpose and re-use. Look around maybe you have something at home you can use too. 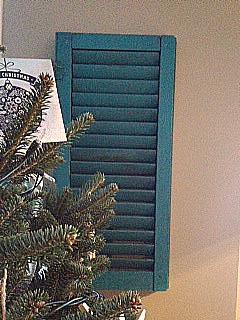 Salvaged shutter painted with homemade chalk paint. Ready for action  Christmas cards proudly displayed I found a few other ideas people have used. Check them out here. . . . . . 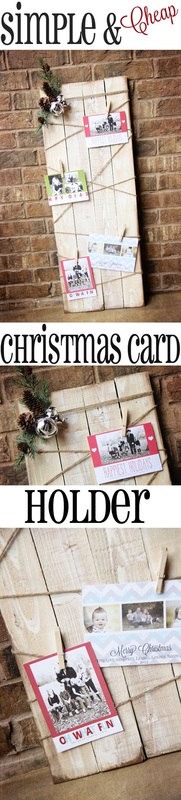 Wood and string display by Shanty2chic 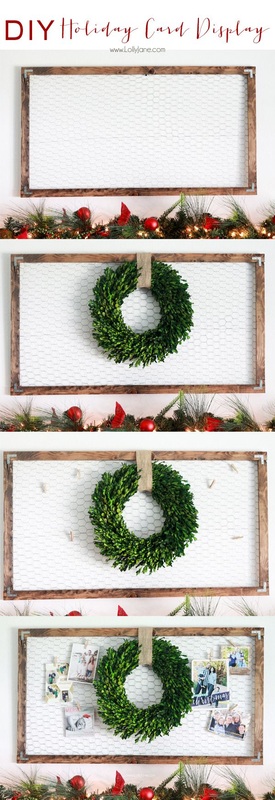 Wood 'n wire wreath and card display 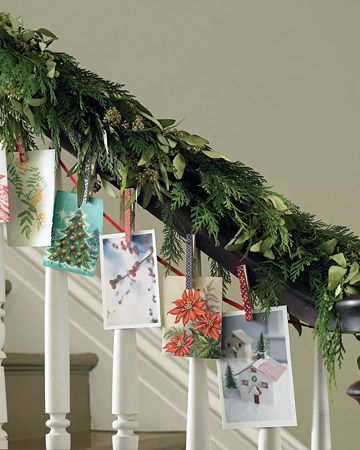 Bannister Christmas card garland- Nature inspired 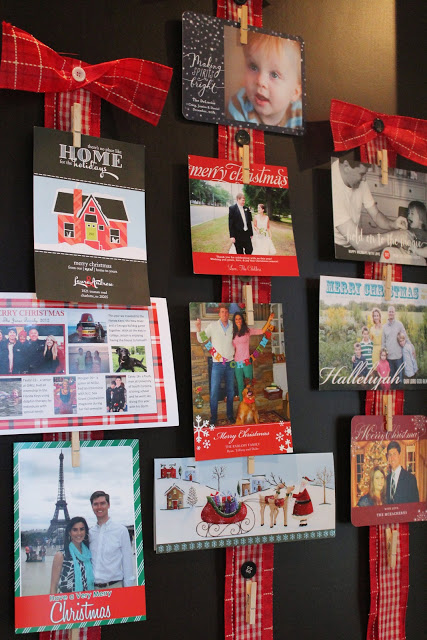 Ribbon in rows That's it for today folks, get out there and check your mail box maybe you have actual cards to put up! let me know your creative ways to show them. Thanks for stopping by! 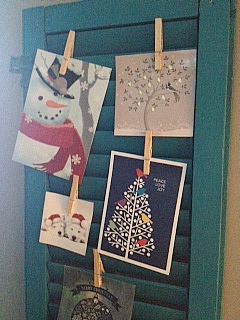 Merry Christmas Everyone! 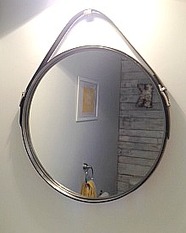 I'm back, with another project from my recent powder room makeover! Do you want to see it? Here we go. . . For a while now I have wanted to make my own Captain's Mirror. You see them everywhere. I have admired them in all my favourite reads in print and on the internet. I saw some DIY versions and thought I can do that! Sometimes I think that and it works out (not always)! This is one of those times. It was quick and fairly easy. Not too expensive compared to designer versions but not super low budget. Read more for my instructions below.

  You can find instructions with video at this link http://houseandhome.com/tv/segment/diy-captain-s-mirror I love my new mirror! I always check out the new trends, but like to make my own instead of buying if I can. That sense of satisfaction is great (when it works out and isn't an epic fail!) Trial and error gets you there in the end. A mirror like this can be used anywhere. It would be great in an entrance way, or over a dresser or vanity. Here are a few great examples. As always "Be Inspired" and give it a try! 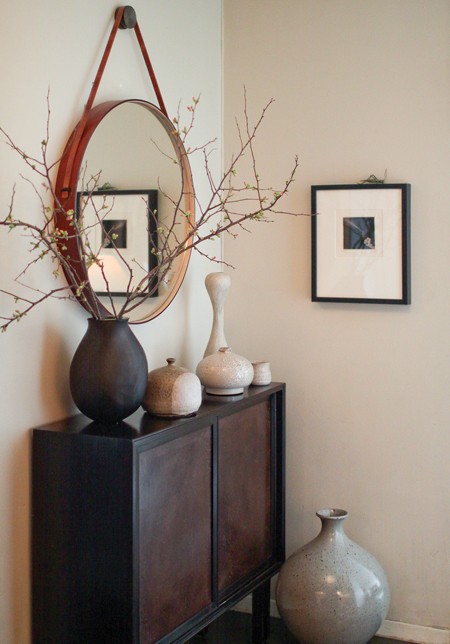 Entry way rustic 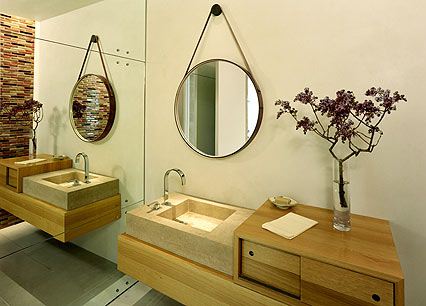 Bathroom vanity simplicity 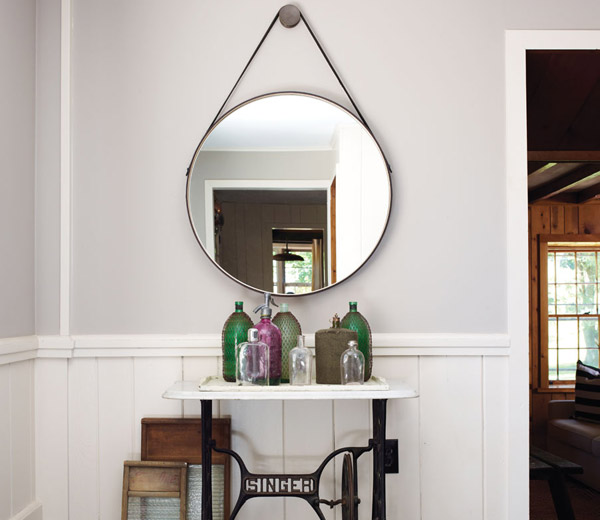 Bar top mirror. Love the sewing table too! Vintage vinyette 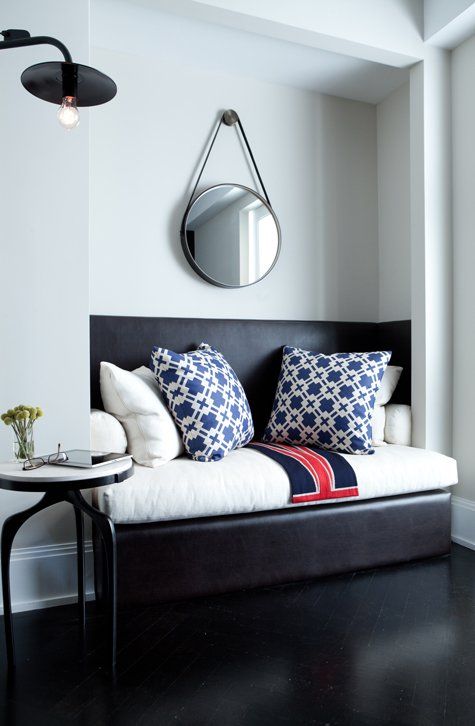 Guest room daybed- Cool utilitarian 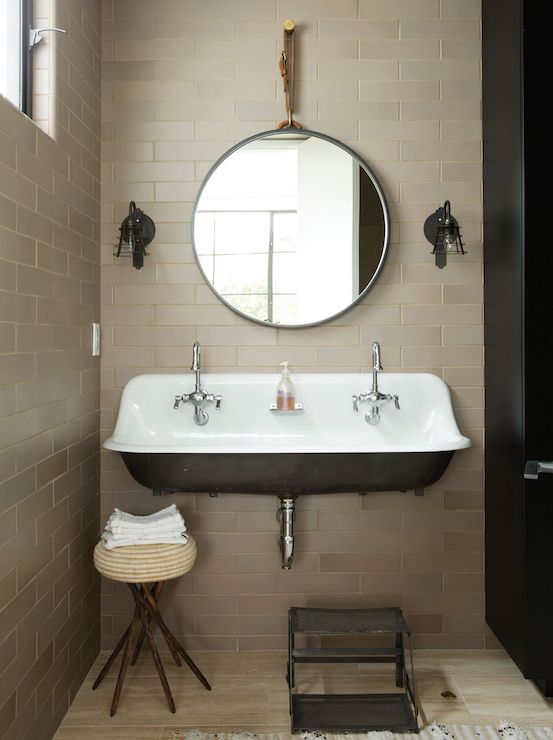 Industrial chic bathroom 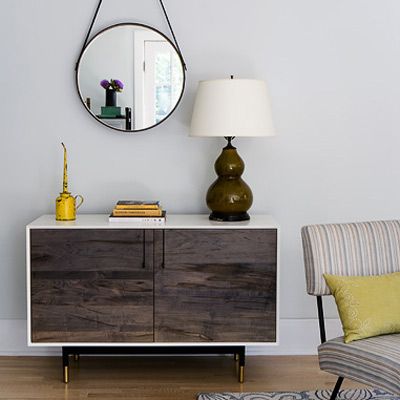 Sideboard mate- loving the old oil can too! Quick & Easy DIY with maximum impact So folks, we just finished a new project here at my house. My favourite so far and I love it! My husband not so much but. . he knows when I set my mind to it then it happens! We decided to refinish our powder room, and when I say we I mean I.... and then we did it! Thanks Steve! In the original powder room we had a standard vanity and laminate counter, a basic sink along with a simple faucet. On the wall we had the not so lovely builders mirror. This was where things started. I wanted to put up a Captain's mirror. To change the mirror would involve a big mess on the wall, which could lead to changing the vanity and so on. . . You know how it goes. We took everything out back to the bare bones. Found a few problems and had to call in a plumber. Once they worked their magic (expensive magic by the way!) I started my first project. I had for year's now, wanted to build a pallet wall. If you don't know what that is check out these cool examples. 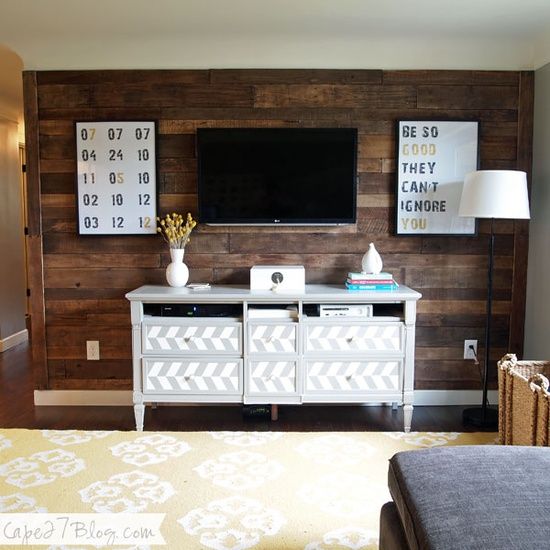 Rustic, warm statement tv wall from cape27 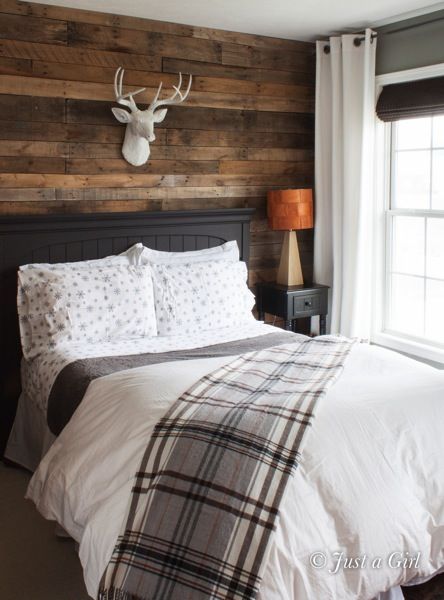 Bedroom accent wall made from wood 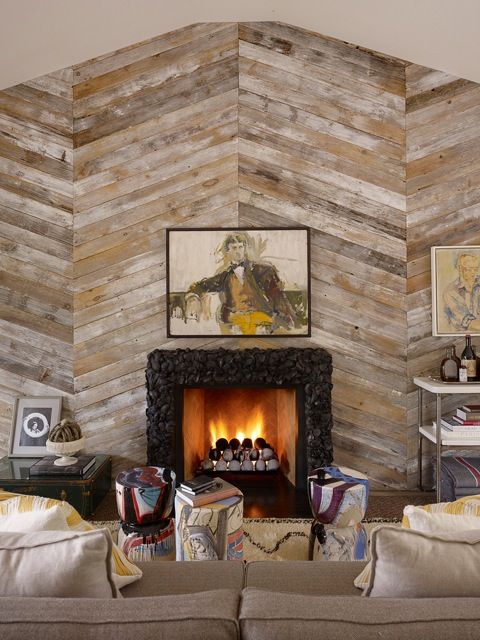 Fabulous herringbone fireplace
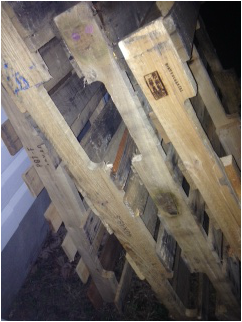

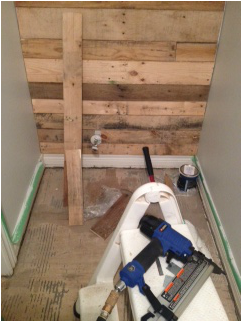
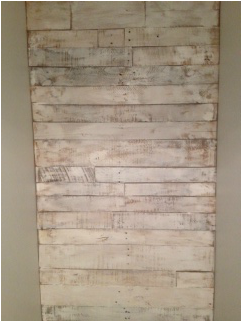 To add a little extra decorative detail I put up a couple of galvanized metal letters and my pallet wall dream came true. Or the outhouse look as my husband calls it. You decide which side your on and maybe you will give it a go. I do have a slight pallet addiction and it could be catching, watch out!  Pallet wall perfection Stay tuned for more powder room projects. See you soon.
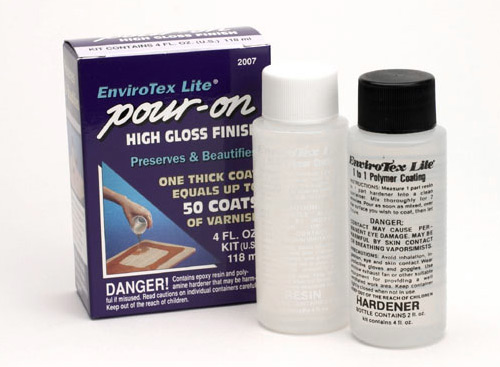
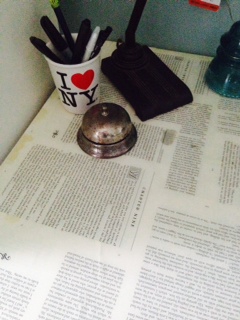 I'm back!. . . . I didn't forget you honestly. I have been busy with a few new projects and I'm going to share one today. On a recent trip to our local Value Village I came away with a great (in my opinion anyway!) old metal desk. It had a few scratches but nothing major and it fit with the industrial style I love. Also it was only $14.99! Bonus! EXHIBIT A 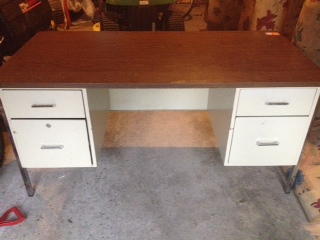 Of course I couldn't fit it in my little car so had to enlist the help of my trusty sidekick- otherwise know as my husband. he very kindly brought it home and the makeover began. My friend Penny and I got together to paint it using her paint sprayer. I had never used one before and she showed me the ropes. . . I still need a little practice and honestly prefer my little roller usually but in this case as we found out their are lot's of little nooks and crannies to cover! Thanks Penny ( seamstress extraordinaire- shameless plug After priming the metal base and drawers with STIX and then painting with Benjamin Moore Advance in Coventry Gray (HC-169), I painted the wood veneer desktop to seal it and then using an old book found at Value Village for $3, I made a collage of pages adhering to the desk with mod podge. 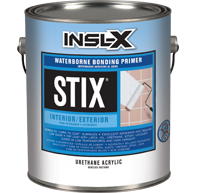    I then sealed it with the same product. However I found it to too uneven so decided to take a different route. I used an epoxy to create a smooth, shiny surface. My daughter had previously used it on some of her art, so she became my assistant. She may say I became hers! Follow the directions carefully and it's not too difficult to use ( especially if your daughter does a lot of it!!) EXHIBIT B- FINISHED DESK READY TO WORK AT - OR NOT! 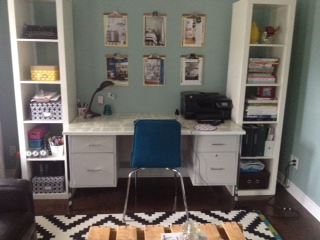 INDUSTRIAL DESK MAKEOVER 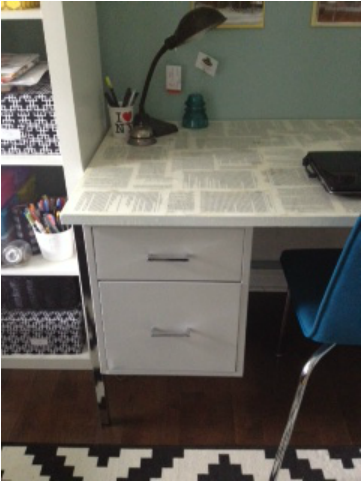 BOOKED AND READY TO GO If you fancy having a go at an epoxy topped desk or table, take a look at these other examples I found to share. . . . instant inspiration 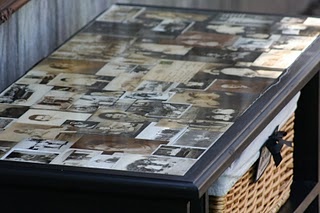 Photo memories found on sistersofthewildwest.blogspot.com 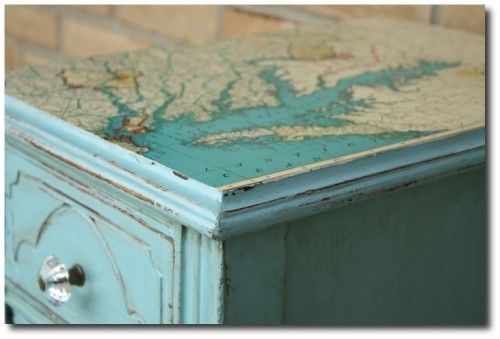 All mapped out from the painted furniture 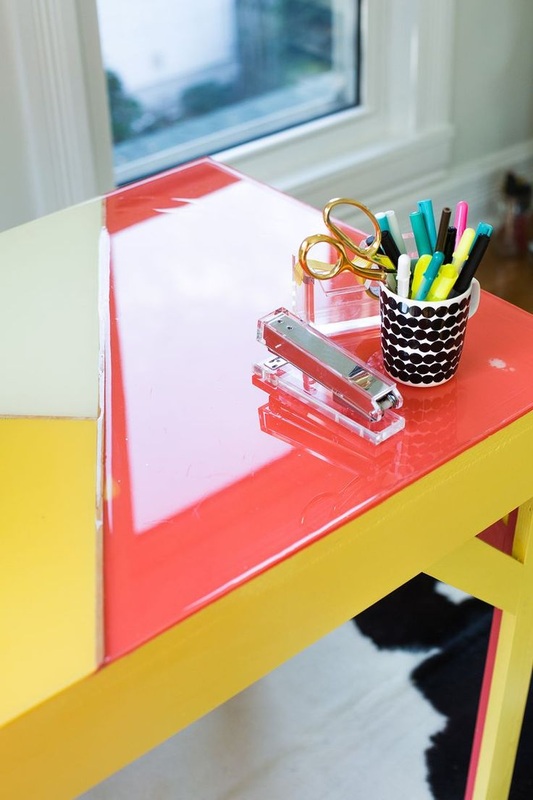 Fabulous colour blocked epoxy by a beautiful mess Turn something plain and ordinary into a personalized piece just for you!
STEP ONE  STEP THREE  STEP 4  I picked out a few other festive table arrangements to show you. Be inspired, get creative. Happy Thanksgiving!  Pumpkin cluster and bouquet from Good Housekeeping  Simple branches and mini pumpkins in a large vase.From carlaaston 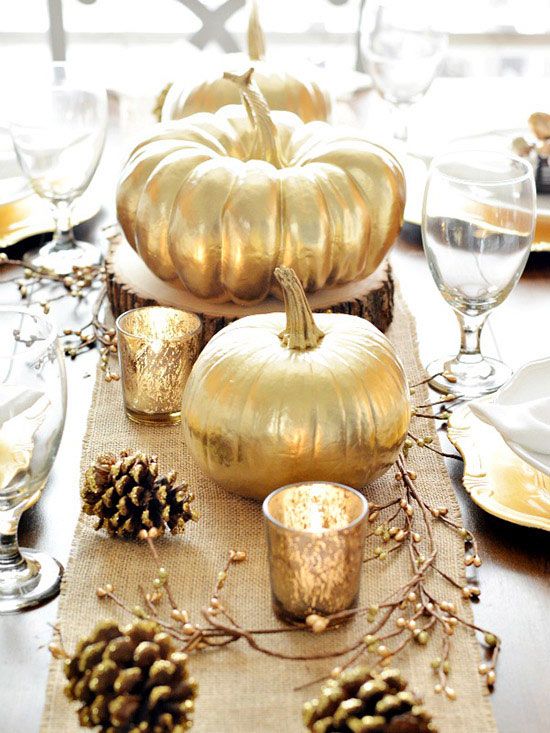 Gold and glamour on your table from Better Homes and Gardens 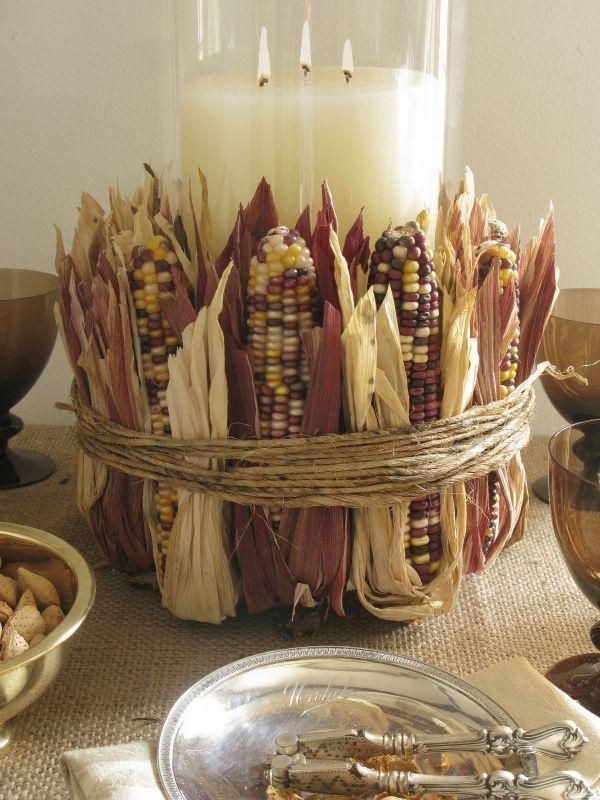 Corn wrapped candle centre piece from Minimalisti  H A P P Y T H A N K S G I V I N G. THANKS FOR READING! 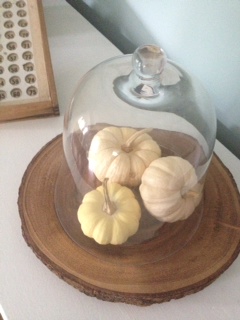 A quick post today to show a easy and on trend way to display and show off any items in your home. I've been noticing an abundance of glass domes or "cloches" in the stores and in my favourite reading materials. I bought a couple a few years back and would bring them out once in a while. The name "cloche" comes from the french for bell and referred to a form fitting felt hat and then later to bell shaped glass. I decided to show off some seasonal mini pumpkins on a great wooden charger I picked up at Chapters. Maybe next it will be pine cones or Christmas ornaments. Simple, ever changing, like rotating art! What do you have that you could put under a dome? Maybe some of these ideas I found. . . . . 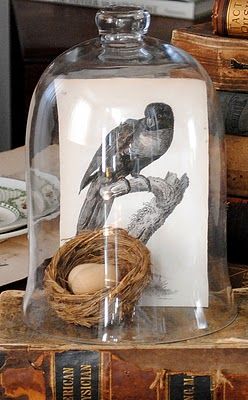 Antique postcard and bird's nest via the graphicsfairy.com 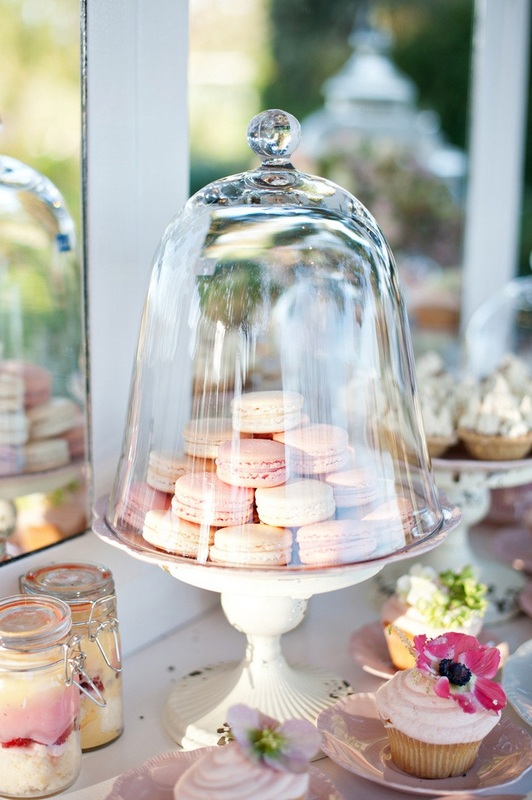 Mmmm.. macaroons from stylemepretty- great for a wedding, birthday party or shower. 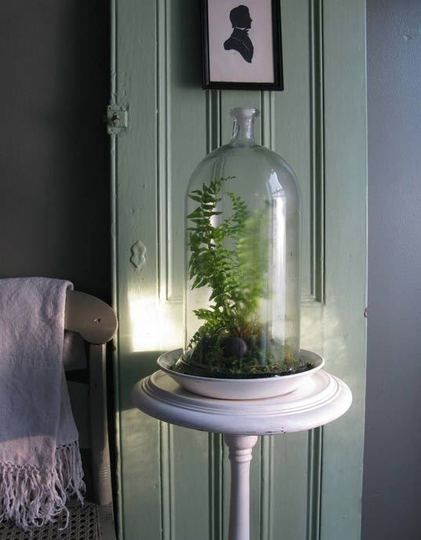 Portable green house- found on apartmenttherapy.com 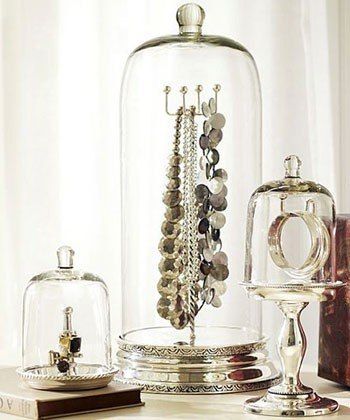 Never thought of this one- organize and display your best jewellery from luckymag.com 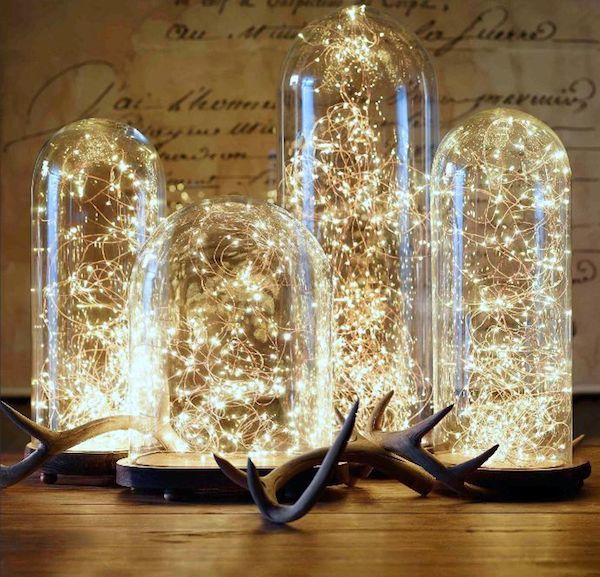 Illuminate your home with these fairy lights under glass at interiorsbystudiom.com That's it for today- until next time. . . . .
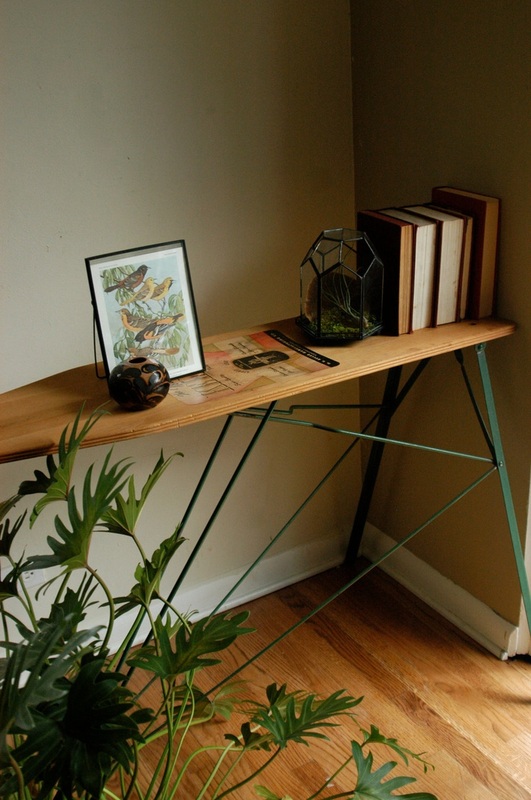
Happy Friday! Time to share another quick project. Last year at a local flea market with my good friend Lisa I picked up an old wooden ironing board for $5, not sure what I would do with it but knew I would regret it if I didn't grab it. There was some water damage and no legs but it could be something. . . . . . . I thought about making it into a shelf but in the end I decided to make it into a sign. I saw some ideas on good ole Pinterest and grabbed my supplies and set to work. BEFORE 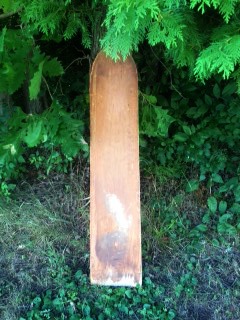
Quick sand, clean, prime then paint with ADVANCE- great product, self leveling and durable. Added letters using a simple stencil. AFTER 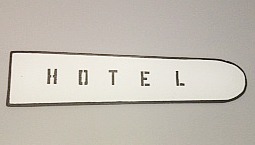 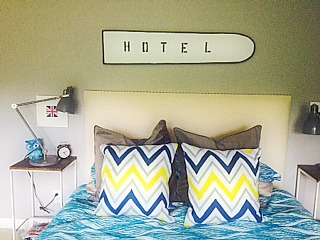 Just in case you have an old ironing board just lying around check out these other ideas I found. 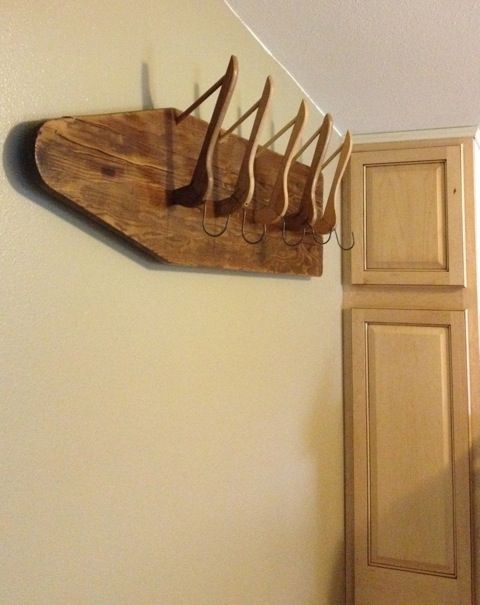
Hang up
Moveable shelving
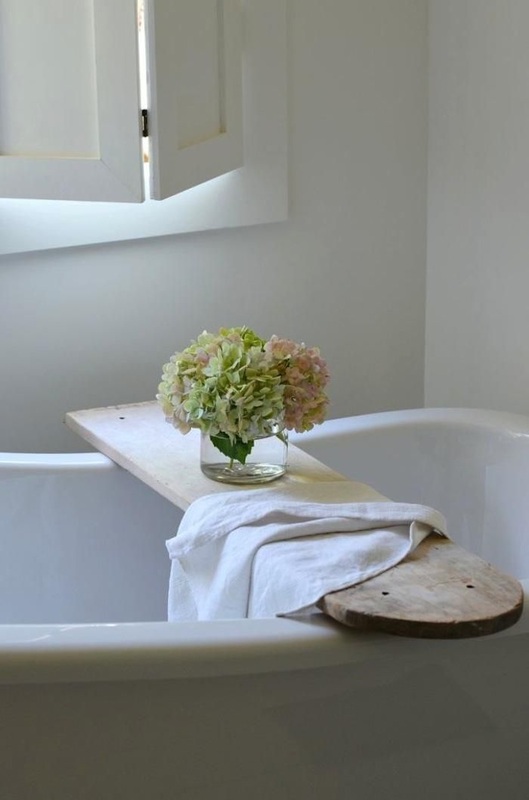
Relax in the tub- with flowers?!
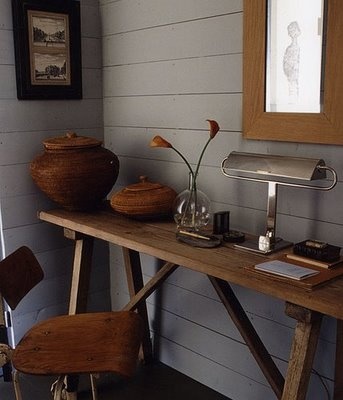
Small but perfectly formed desk
Well that's it for now. Off to finish another project!
|
Julie is an Interior Decorator with a passion for anything creative ArchivesJanuary 2015 CategoriesAll ArchivesJanuary 2015 CategoriesAll To subscribe click below
|

 RSS Feed